From "Larry Ludwig"
"Weighing a keel while attached to a boat can be done with a high degree of accuracy. You can test this out on a boat with a removeable keel. Lay the boat on it's side with the keelbulb on the scale with the keel parallel to the table. Then take the keel off and weight it and you will be amazed that they are nearly the same, as in within 95% or better."
6/29/2006
WINCHRAFT #1 by Bob Harris (swingarm SCU, 1979)
Harris Engineering of Springfield, Va. has furnished the following excellent article, WINCHRAFT #1: which we reprint here with the permission of Bob Harris. (1979)
"You say you're having trouble figuring out how to set up your HERCULES or Little Herc? -- or somebody else's swingarm Sail Control Unit? Perhaps the following thoughts will help.
1. Think of the moving arm of the winch as forming 2 sides of an isosceles
triangle when it is full in and full out -- or if you like it better, at one end of its travel and the other. You can measure it better, at one end of its travel and the other. You can measure the included angle between the two equal sides formed by the two positions of the winch arm -- right? Now, the third side (the hypotenuse for you geometricians) is the distance the sheet line will travel, if it is tied to the end of the arm, and the winch is operated through its full travel. So, the question really is, how do you find the hypotenuse of an isosceles triangle? Well, the formula:
a = 2c sin A/2
Where a is the hypotenuse, c is the length of the SCU arm from pivot to the point of sheet attachment, and A is the angle included between the two end positions of the SCU arm. It also happens that the included angle is 90 degrees (a right angle) the hypotenuse length is 1.414 times the effective length of the SCU arm.
This then will tell you how much sheet travel you can get from a swinging arm SCU Obviously it depends on how long the arm is, and where the limit switches stop the unit from further rotation.
2. Next problem is, how much sheet line travel do you need? Well, if you think about it a moment, the same isosceles triangle setup applies, for example, to your main boom. The length of "c" in the formula above is the distance from your boo,.-.1 gooseneck swivel to the place the sheet line attaches to the boom, and the angle A is the angle from the centerline of the yacht to the place where your boom hits the sidestay - OK? Looking at the formula again, then, "a" has to be the hypotenuse,or the length of the sheet line needed to let the boom move from midships to full out. Again, obviously, how much sheet line you need depends on how far out on the boom the sheet line is attached, and how far you want the boom to swing. If it happens to be 90 degrees, you need 1.414 times the length of the boom for swivel to sheet attachment point.
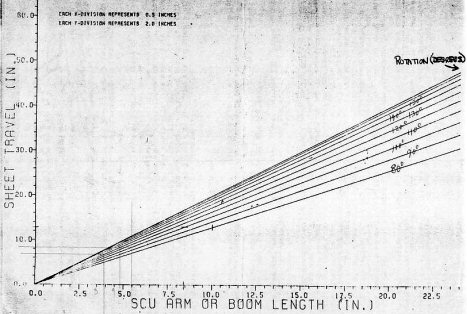
3. Next question is, where's your high school trig book -- the one with the sine table in it? Your wife threw it out with your WW2 uniform. Never fear! Harris_ has thought of everything. Take a look at the attached graph(separate post). Let's assume you are working on a. kit yacht whose manufacturer has told you where to bring the sheet out through the deck (and, I hope) to attach it to the boom directly above the exiting point.
--
First, find the effective length of the boom. Let's assume it is 10 inches, and that inspection of the drawings tells us that 80 degrees of boom swing is needed.
Enter the graph on the horizontal axis (SCU- arm or boom length) at the 10" mark and go directly up until the 10" line intersects the 80 degree diagonal line.
--
Now go horizontally from that point to the left and you will read, the vertical axis, less than 13 inches (which is the amount of sheet travel you need.
--
Now how to make the SCU give it to you?
Well, let's again assume that .at your SCU is set right now for 100 degrees of travel between limits. So, come back from the left side at the 13 inch point, until you intersect the 100 degree diagonal and then drop straight down.
You'll find that you hit the horizontal axis at just short of 8 1/2". This is the length arm needed on your SCU.
4. What's that? It won’t fit the hull. The arm is too long? Great Ceasar's Goat:! Seriously, don't panic all will be well. Using our winch-craft, lets's cast a spell, and fix, the problem.
The graph we're working with is built on the assumption that the sheet end is attached to the winch arm, (what us experts call "single purchase" and all we have to do is pass the sheet line through the SCU arm hole to which the sheet line was to be tied, and run it back in the direction it
came from, securing it to something, in the hull.
I like to use a small wood block with a screweye in it. Now, when the arm moves, it will -move twice as line for the same amount of rotation, so we can use an arm exactly half as long—or 4 1/2 inches. 1f that won' t fit in your yacht, it' is a submarine and you have been. misled! Actually, you can go as far as triple purchase arrangements this way, but I don't recommend going further than that.
5. Don't worry about being too, too precise in all this. -First the line you us stretch a bit, anyway, you’ll make your touch-up adjustments in boat, if you’re smart.
Fiberglass notes from THE FIBERGLASS MODEL YACHT BUILDERS GUIDE by David L. Mainwaring 1979
This is a guide to assist the model builder in building model sailing boats from kits with fiberglass hulls and associated components.
"FIBERGLASS"
Fiberglass is the common name for glass reinforced plastics, GRP. The strands are produced in a non-woven cloth called matt and in a woven cloth called fiberglass cloth, boat cloth, tooling cloth and woven roving. After the cloth has been saturated with resin and the resin cured (hardened) we have fiberglass. Fiberglass matt and cloth are sold by the yard in small lots by retailers and by the pound by wholesale suppliers. Matt and cloth are designated in thickness by referring to their weights. Matt is weighed by the square foot with 3/4 to 3 oz. matt being most common. Cloth is also weighed but unlike matt it is weighed by the yard. Thus a 9 oz, cloth has the same glass content as 1 oz, matt. Matt and cloth have different handling characteristics and different conformability as well as different impact and strength factors. Working with matt using brush-on resin requires skill and experience to avoid developing one big mess of glass fibers and resin. You will find with a little practice that matt conforms well when worked with a resin-covered surface with a constantly wet brush. A matt called surfacing matt can be used to work the regular matt in place and squeeze out air bubbles and excess resin. This matt is hard to obtain other than from wholesalers. A layer of cloth works well for surfacing if you can stand the added weight. Fiberglass cloth put up in tape form is widely available. It is a convenient way of getting high quality cloth in small quantities. It is important for the glass resin combination to have as high a glass content as possible for strength. Fiberglass cloths used in boat building must have a special treatment called Chroming to make the glass compatible with the resin. Do not use industrial or auto grade fiberglass cloth unless it is treated.
Fiberglass (GRP) laminates will absorb water through the capillary action of the glass fibers. The problem of water absorption and surface abrasion is overcome in the molding stage by adding a specially formulated resin known as gelcoat. Although gel-coat is available clear, it is usually pigmented to give the surface resin a molded-in color. Polyesters and lay up resins can be pigmented giving the part a solid color throughout. This is an inexpensive way of molding color in but it presents two problems - hidden air bubbles within the laminate and exposing glass strands.
Star 45 R/C model sail boat | Resins, tips and tricks
Polyester resins are formulated in many make ups. To change the liquid resin to a solid you must add a hardener to catalyze the mixture. Whenever resin is referred to in this manual it is intended that it be properly catalyzed before use. The resin you choose for your model should be pre-accelerated. This resin will commonly have a purplish hue in the liquid stage and may change color to indicate states of cure. Resins should be at room temperature (60°-90°F. ) for curing. Among the polyester resins `available are the air, inhibited types. Lay up, spray, and gel-coat resins are formulated so their surfaces will not cure readily while exposed to air. This is advantageous if several layers of glass are to be laminated over a period of time. However, it may present a problem to the unsuspecting buildr who finds the surface of his resin "forever tacky". Sometimes, applying a layer of hard .bowling, alley wax will solve this problem. Gel- coat resins therefore, are' not used as a finish coating on completed boats because they are air-inhibited.
Finishing resin or hand-lay-up resin is commonly a waxed resin. When special waxes are formulated in the resin they will move to the surface as the resin cures. This is an advantage if this is the outer surface. If you want to bond to: this, surface you must first sand it thoroughly and then '" prepare, the surface with acetone or polyester solvent.
Polyester resins may be thinned with acetone and styrene. The common polyester hardener is methyl ethyl kettle peroxide (MEK60). -Resin and hardener 'must' be handled most carefully and in strict accordance with the manufacturers -instructions. The amount of hardener or activator in conjunction `with the room or ambient temperature determines the jel time and the cure' rate' of the resin. The jel time is the period that the resin remains liquid until it turns to a jelly just before curing hard. Resin has a "pot life" and is only workable for the time before it jels; this may vary from seconds to several minutes. CAUTION-DO NOT use too much hardener. Styrene will thin the resin' and become chemically part of the cured resin. Acetone will thin the resin but will evaporate during cure. Acetone will change the characteristics of the cured resin and may result in brittleness and other unwanted characteristics.
Polyesters may be filled with a 'number of components from sawdust to pecan shells. Most common fillers are Cabosil and micro-balloons and macro-balloons. This filling may make the resin thixotropic and filled resin may vary from a slurry to a heavy paste. Macro-balloons and micro-balloons are used to make a foam-like putty that will work as a flotation foam.
Polyester will bond nicely to polyester. We stress that surfaces must always. be cleaned and prepared for bonding. The bond between two fiberglass parts, such as keel and shell or hull and deck, will be enhanced if the interface between bonded surfaces is filled with a layer of saturated matt, cloth, or filled resin. Polyester resin is frequently used to bond to wood as a glue. However among wood glues, polyester rates poor. The initial bond to wood may look all right but it has a history of delaminating. We will not rule out its use for model building. However, there are better wood glues and the best of the waterproof glues are better, many epoxies.
Fiberglass is not at its best under tension. Spread or distribute any tension . load over a wide area. The same goes for compression loads that should be spread out also. This fiberglass found in models will tear if pulled on so always spread the load - more on this later.
You must remove all waxes in order to bond to fiberglass and you can reverse this and coat surfaces with hard floor waxes during building to protect surfaces from accidental spills. Also remember to use only resin-resistant tape such as Scotch brand Cellophane tape which is inert to resins; regular masking tape may be used if not in contact with resin or solvents.
Fiberglass has the outstanding feature that when molded in curves it has very high strength imparted to the part because of the curves. On smaller models the curves of the hull provide sufficient strength for the model. On larger models you will need stiffeners. These may be ribs or bulkheads which add support to the hull. These can be of the aircraft framework type. Another stiffening method is to make a sandwich. Here the strength of the GRP is achieved by laminating a light weight core between two layers of fiberglass.
From: "Mitch Martin" 2006 August 1
Working with WEST is similar to polyester resin, but it is stronger, doesn't smell bad, and hardeners can be selected for your application. For example if I was mixing the epoxy for glassing a hull that would eventially be painted I would select the extra-slow hardener 209 which has a pot life of 45 minutes. That's much longer than a polyester resin pot life. The down side is the cost, it's pretty pricy stuff. Another trick is to mix in the graphite powder and it gives the finish a carbon fiber look.
from John 2006 August 1
The pot life with the 105/209 is 40 min or so. I have used that
combination when doing vac bagging and it allowed plenty of time to wet
out the fabric on a 60" boat, then apply mastic, then the bagging
materials, then pull the air out. I have also done 72" long 10R's and had
no issues with the pot life. Now I am usually about 70 deg, so that slows
it down some too.
Now the 105/205 can be more in the 10 to 20 min range depending on temp.
Also how deep the container is that you mix the epoxy will influence the
cure time. Deeper is faster.
Billie Geisler's comments regarding Epoxy:
I use strips of cardboard scissored from breakfast ceral boxes for mixing and applying the epoxy. I use aluminum beer cans for containers. I cut the bottoms off about an inch up the can with a curved exacto knife. I find that I can get a pretty good mix of resin to hardener by cutting the mixer cardboard the same size, then use them to measure the epoxy and hardener.
I dip the cardboard mixer stick into the resin and scrape off all that will remain on the stick, after I wind up the strings, into the beercan. Then I use another fresh cardboard mixer stick, and dip it into the hardener to the same depth as I dipped the first stick into the resin. I let it drip once before I scrape it into the beer can. The difference in viscosity seems to get the ratio about right, even though it seems that no way is the little bit of hardener that stays on the dipper is going to be enough to work. The cardboard mixer sticks are inserted vertically into the resin and hardener, and scraped on the edge of the beer can.
You can pretty accurately go from a hot mix to a slow mix by simply varying the depth of the mixer stick in the hardener. It works on very small amounts, and about two dips from a half inch wide cardboard mixer stick will be enough for a plank on each side.
I use small jars to contain the epoxy components that I am working with, and label both the jar and the matching lid as resin or hardener. That way, if I happen to dip the used hardener dipper into the resin, or mix up the lids, I don't loose my whole supply. I like horshradish jars from Kraft.
Experiment with your epoxy before smearing it on your hull, as my epoxy is about 20 years old and the ratio of hardener to resin may work differently with yours. Just vary the depth of the hardener dip relative to the depth of the resin dip, until it works for you. It doesn't take long to learn to mix very small amounts with reliable cure results.
Finishing resin or hand-lay-up resin is commonly a waxed resin. When special waxes are formulated in the resin they will move to the surface as the resin cures. This is an advantage if this is the outer surface. If you want to bond to: this, surface you must first sand it thoroughly and then '" prepare, the surface with acetone or polyester solvent.
Polyester resins may be thinned with acetone and styrene. The common polyester hardener is methyl ethyl kettle peroxide (MEK60). -Resin and hardener 'must' be handled most carefully and in strict accordance with the manufacturers -instructions. The amount of hardener or activator in conjunction `with the room or ambient temperature determines the jel time and the cure' rate' of the resin. The jel time is the period that the resin remains liquid until it turns to a jelly just before curing hard. Resin has a "pot life" and is only workable for the time before it jels; this may vary from seconds to several minutes. CAUTION-DO NOT use too much hardener. Styrene will thin the resin' and become chemically part of the cured resin. Acetone will thin the resin but will evaporate during cure. Acetone will change the characteristics of the cured resin and may result in brittleness and other unwanted characteristics.
Polyesters may be filled with a 'number of components from sawdust to pecan shells. Most common fillers are Cabosil and micro-balloons and macro-balloons. This filling may make the resin thixotropic and filled resin may vary from a slurry to a heavy paste. Macro-balloons and micro-balloons are used to make a foam-like putty that will work as a flotation foam.
Polyester will bond nicely to polyester. We stress that surfaces must always. be cleaned and prepared for bonding. The bond between two fiberglass parts, such as keel and shell or hull and deck, will be enhanced if the interface between bonded surfaces is filled with a layer of saturated matt, cloth, or filled resin. Polyester resin is frequently used to bond to wood as a glue. However among wood glues, polyester rates poor. The initial bond to wood may look all right but it has a history of delaminating. We will not rule out its use for model building. However, there are better wood glues and the best of the waterproof glues are better, many epoxies.
Fiberglass is not at its best under tension. Spread or distribute any tension . load over a wide area. The same goes for compression loads that should be spread out also. This fiberglass found in models will tear if pulled on so always spread the load - more on this later.
You must remove all waxes in order to bond to fiberglass and you can reverse this and coat surfaces with hard floor waxes during building to protect surfaces from accidental spills. Also remember to use only resin-resistant tape such as Scotch brand Cellophane tape which is inert to resins; regular masking tape may be used if not in contact with resin or solvents.
Fiberglass has the outstanding feature that when molded in curves it has very high strength imparted to the part because of the curves. On smaller models the curves of the hull provide sufficient strength for the model. On larger models you will need stiffeners. These may be ribs or bulkheads which add support to the hull. These can be of the aircraft framework type. Another stiffening method is to make a sandwich. Here the strength of the GRP is achieved by laminating a light weight core between two layers of fiberglass.
From: "Mitch Martin" 2006 August 1
Working with WEST
from John 2006 August 1
The pot life with the 105/209
combination when doing vac bagging and it allowed plenty of time to wet
out the fabric on a 60" boat, then apply mastic, then the bagging
materials, then pull the air out. I have also done 72" long 10R's and had
no issues with the pot life. Now I am usually about 70 deg, so that slows
it down some too.
Now the 105/205 can be more in the 10 to 20 min range depending on temp.
Also how deep the container is that you mix the epoxy will influence the
cure time. Deeper is faster.
Billie Geisler's comments regarding Epoxy:
I use strips of cardboard scissored from breakfast ceral boxes for mixing and applying the epoxy. I use aluminum beer cans for containers. I cut the bottoms off about an inch up the can with a curved exacto knife. I find that I can get a pretty good mix of resin to hardener by cutting the mixer cardboard the same size, then use them to measure the epoxy and hardener.
I dip the cardboard mixer stick into the resin and scrape off all that will remain on the stick, after I wind up the strings, into the beercan. Then I use another fresh cardboard mixer stick, and dip it into the hardener to the same depth as I dipped the first stick into the resin. I let it drip once before I scrape it into the beer can. The difference in viscosity seems to get the ratio about right, even though it seems that no way is the little bit of hardener that stays on the dipper is going to be enough to work. The cardboard mixer sticks are inserted vertically into the resin and hardener, and scraped on the edge of the beer can.
You can pretty accurately go from a hot mix to a slow mix by simply varying the depth of the mixer stick in the hardener. It works on very small amounts, and about two dips from a half inch wide cardboard mixer stick will be enough for a plank on each side.
I use small jars to contain the epoxy components that I am working with, and label both the jar and the matching lid as resin or hardener. That way, if I happen to dip the used hardener dipper into the resin, or mix up the lids, I don't loose my whole supply. I like horshradish jars from Kraft.
Experiment with your epoxy before smearing it on your hull, as my epoxy is about 20 years old and the ratio of hardener to resin may work differently with yours. Just vary the depth of the hardener dip relative to the depth of the resin dip, until it works for you. It doesn't take long to learn to mix very small amounts with reliable cure results.
Billie Geisler's comments regarding Epoxy:
I use strips of cardboard scissored from breakfast ceral boxes for mixing and applying the epoxy. I use aluminum beer cans for containers. I cut the bottoms off about an inch up the can with a curved exacto knife. I find that I can get a pretty good mix of resin to hardener by cutting the mixer cardboard the same size, then use them to measure the epoxy and hardener.
I dip the cardboard mixer stick into the resin and scrape off all that will remain on the stick, after I wind up the strings, into the beercan. Then I use another fresh cardboard mixer stick, and dip it into the hardener to the same depth as I dipped the first stick into the resin. I let it drip once before I scrape it into the beer can. The difference in viscosity seems to get the ratio about right, even though it seems that no way is the little bit of hardener that stays on the dipper is going to be enough to work. The cardboard mixer sticks are inserted vertically into the resin and hardener, and scraped on the edge of the beer can.
You can pretty accurately go from a hot mix to a slow mix by simply varying the depth of the mixer stick in the hardener. It works on very small amounts, and about two dips from a half inch wide cardboard mixer stick will be enough for a plank on each side.
I use small jars to contain the epoxy components that I am working with, and label both the jar and the matching lid as resin or hardener. That way, if I happen to dip the used hardener dipper into the resin, or mix up the lids, I don't loose my whole supply. I like horshradish jars from Kraft.
Experiment with your epoxy before smearing it on your hull, as my epoxy is about 20 years old and the ratio of hardener to resin may work differently with yours. Just vary the depth of the hardener dip relative to the depth of the resin dip, until it works for you. It doesn't take long to learn to mix very small amounts with reliable cure results.
MODEL YACHT BUILDERS GUIDE "TOOLS"
The average kit builder will need few special tools. When working on hardened fiberglass parts we recommend this model craftsman's' tool known by its trade name the DREMEL MOTOR TOOL. ' With this you can sand, carve, cut, trim, grand, and much more. It takes the cussing out of trimming fiberglass and cutting holes in hulls. Other than that, the usual assortment of clothe s pins of the spring variety, sharp modelers knives, Exacto tools, rubber bands, a few coarse Bastard Files and a couple of Mill Files, and a supply of 3M-ite wet or dry sand paper #220, #320 and #600 will be adequate.
MODEL YACHT BUILDERS GUIDE "G.R.P. LOAD SPREADING"
Flat surfaces or slightly curved surfaces such as the bottom of the Sirius 45 model have only moderate fiberglass strength unless sandwich construction or several layers of glass are used. To avoid this added weight, load spreaders are used to distribute loads over a wide area of the flat surface. A sectional shape called a Tee or Top Hat will greatly strengthen a flat glass panel. This works on the same idea that an I beam works in steel construction. A piece of cardboard, plywood, spruce, or another fiberglass component is used to form a right angle to the flat surface. A piece of glass tape or matt is placed so as to form a right angle with the flat surface being the. top of the letter T. When molded in place with some activated resin the finished Tee section acts as a solid brace equal to the height of the Tee. The cardboard former or plywood may be removed if it was waxed before the resin was applied. For still additional strength, form what is called a Top-Hat that is a double Tee section with a cap between the tees. Cut in half it would look like a top hat. The former used a build the Top Hat can not be removed. Using Tees and Top Hats can strengthen a hull or component without using up significant hull space. You may use bulkheads of poly-urethane foam to make tee sections and leave the foam in for flotation. Do not use Styrofoam or any styrene-based foam; it will dissolve away in resin. Once again, remember that surfaces must be prepared for gluing or bonding to them.
MODEL YACHT BUILDERS GUIDE "SAFETY"
Always work in a well ventilated area. Resins, hardeners, and solvents are flammable and toxic. MEK60 is impact sensitive. Some people are ' especially sensitive to any and all components. Avoid excessive skin contact. Avoid inhaling concentrated fumes. Wash well and keep skin clean from these chemicals. chemicals follow manufacturers instructions. DO NOT SMOKE or have open flame around when working with fiberglass chemicals. Select an appropriate work area. Protect furniture, floors and other surfaces from spills and spatters {.o prevent permanent damage from these substances. Remember that the fibers of the fiberglass are irritants and commonly cause skin itching and irritation. When sanding, use a barrier cream or gloves, protective clothing and sanding mask and clothing and careful clean up methods as you work.
Fiberglass is just that, GLASS, and it will cut if you are not careful. When you sand, cut or trim anything made from fiberglass keep in mind that it can be as sharp as anything known to man.
Fiberglass is just that, GLASS, and it will cut if you are not careful. When you sand, cut or trim anything made from fiberglass keep in mind that it can be as sharp as anything known to man.
Subscribe to:
Posts (Atom)