Racy SUPER MODELS - radio controlled model yacht racing Boat/US Magazine:
"Racy SUPER MODELS - radio controlled model yacht racing
Boat/US Magazine, May, 2000 by Elaine Dickinson
With the pop of the starting gun, all hands flew into action. Rudders strained to tack sharply and get on the favored side of the racing course; sails were trimmed tight as a drum to eke every last iota of speed out of the wind; waves slammed into bows and washed clear over the decks. And as the fleet raced toward the first turning mark, the atmosphere intensified and nervous fingers grabbed the toggle switches for additional maneuvering.
Toggle switches?
Model yacht racing, or 'RC' racing (for 'radio controlled') is what gets many boaters through the winter. It keeps the adrenaline flowing from the thrill of competition, albeit on a small scale. But, like boating, it offers camaraderie and fun that's easily accessible to anyone with working fingers and enough charged up AA batteries for an afternoon of sailing.
Thinking small is easier on the bank account as well. The outlay for a ready-to-sail RC boat is usually in the hundreds of dollars, not thousands. Access to the water is as simple to find as a quiet pond at a local park. Some cities have even built special yacht racing ponds, such as San Diego, because it's such an eye-catching attraction.
Advertisement
'Model racing is less of a commitment in terms of time as well as money,' said Dick Rutledge, a BoatU.S. member from Houston who is also the national vice president of the American Model Yacht Association (AMYA), the all-volunteer organization which sanctions classes of RC boats and all official races. 'I can have my model loaded and on the water in 20 minutes.'
Rutledge and his wife Nancy are avid racers on Lake Conroe in Texas and compete in their full-sized 'people boat,' a Ranger 22. One day at the dock, one of their Ranger class friends was playing with a model yacht and handed the control box to Rutledge. 'I was hooked,' he said, and now travels throughout the U.S. to compete in the Star 45 and 36/600 class races. His wife is a top competitor as well. The Rutledges also belong to the Houston Model Yacht Club, one of 120 in the U.S. that organize local races."
1/27/2007
The Fundamentals of Fiberglass - Fibre Glast Developments
The Fundamentals of Fiberglass - Fibre Glast Developments: "Worksheet For Estimating Materials
1) Begin by calculating the surface area of the project. Estimate irregular shapes by measuring the approximate sized rectangles necessary to contain the tapered areas. Multiply the length times the width for each rectangle, and then add all of individual rectangles together to get the total surface area of the part. If the calculation is in square feet, divide by 9 to get square yards.
2) Make a list of each type of reinforcement being considered for the lamination. Multiply the square yards calculated above times the ounce weight of the fabric. This is the total weight of one layer of that material. It is also the amount of resin required to saturate it. When this is known for two or three different types of materials, it is possible to calculate the weight and cost of a laminate constructed from any combination of these fabrics. To convert the ounce weight to pounds, divide by 16. Those inexperienced in saturating fiberglass tend to use far too much resin. A well saturated laminate is uniformly translucent, without milky appearing dry spots, but for the sake of weight and cost, has little excess resin in it."
The Fundamentals of Fiberglass - Fibre Glass Developments
The Fundamentals of Fiberglass - Fibre Glass Developments: "Estimating Material Weights And Cost
Accurate material estimates are necessary for two reasons.First, they obviously are needed for proper ordering, material stocking, and bidding of projects. More importantly though, estimates offer the opportunity to calculate the weight or cost of the part using a variety of laminating schedules before beginning to build.
Unlike estimating coverage when painting, resin usage will vary depending on the type of reinforcement being used. The heavier the fabric, the more resin it will take to wet it out. A good hand laminate consists of about 50% fabric and 50% resin by weight. For example, if an application requires 3 sq yds of a 4 oz/sq yd fabric (total fabric weight = 12 ounces), 12 oz of resin will also be needed. However, if 3 yards of 10 oz/sq yd fabric is chosen (total fabric weight = 30 ounces), 30 oz. of resin will be needed.
Glass mat requires a minimum of 2 ounces of resin for each ounce of mat. Therefore, it the application calls for 20 sq feet of 1-1/2 oz/sq ft mat, it will require a minimum of 60 ounces of resin. Remember that mat is specified in ounces per square foot, where fabrics are specified in ounces per square yard. 1-1/2 oz/ sq ft chopped mat actually weighs 13.5 oz/ sq yd!
Since there are so many possible combinations of materials, one should calculate the weight and cost of a single layer using a variety of reinforcements. These can then be added or subtracted form the theoretical laminate until the design properties are achieved."
1/22/2007
Wooden Canoe Journal - Issue #108
Wooden Canoe Journal - Issue #108: "Wooden Canoe Journal
Issue #108 - December 2001 - Volume 24 Number 6
FEATURES
* Pierre Trudeau's Canoe Featured in One of Two New Canadian Canoe Museum Exhibits
* Dave Baker 1941-2001
o by Jack McGreivey
* A Remembrance of My Father
o by Todd Baker
* A Master Craft Man
o by Fred LeBrun
* Canoe or Kayak?
o by Patty MacLeish
* Building a Quarter Scale Model of an Algonkin Hunter
o by Arnie Spielbauer"
1/18/2007
The Big Day!! Star 45 Launch
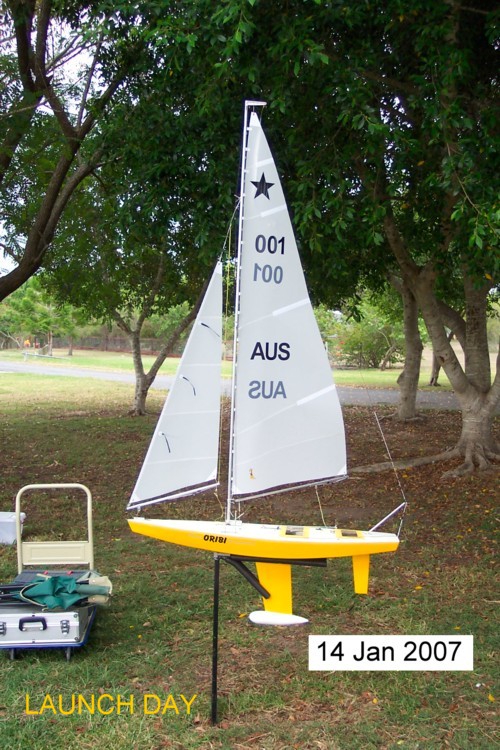

From: John Whiteford
G'day ,
Great morning yesterday when we launched Oribi tho for the first time for some time the weather was overcast and the wind fickle. However all went well and she looked pretty good and some good comments from the few members there. Had a couple of nice gusts which pushed her along and she went well, so looking forward to next time. Took heaps of photos and attach the best here. Must qualify the CHRISTENING!! The phial in Julia's hand contains red wine which she rubbed over the bow with her finger....not allowed to take alcohol into this park!! So I drank the rest last night!!!!! Also please note the cap in PROUD OWNERS. I got quite a few comments re this!!! and stirred them up!!! I was wondering if any of these should be placed on the Star45 website and where. If you think so would you be kind enough to copy them there for me please Don. Also thanks for the advice on the bow bumper and will sort something out along that idea.
Kind regards,
John


1/04/2007
S45 Construction : rigging b.o.m. from John Fisher
To:Star45@yahoogroups.com
From: 'J Fisher'jfisher@wildblue.net
Sender: Star45@yahoogroups.com
Date: Wed, 3 Jan 2007 21:02:38 -0700 (Mountain Standard Time)
Subject: Re: [Star45] Deck rigging and such
Here is the list on the star 45 yahoo groups for rigging. I am using the following for my next couple of builds:
GBMY item #, description, qty, purpose
019, 3/8' alloy tube, 1, Jib boom
034, Hales single block, 2, main and jib sheets
146, tapered drain plug, 1, plug in transom
182, Z sheet hook, 2, sheet ends/boom attachment
202, large bowsie, 1, back stay/forestay with 80 lb Dacron, order small ones if using spektra
206, O-rings, 1, hold the Z hooks to the boom.
254, double block, 2, main sheet and jib sheet adjuster
255, sheet exit, 1, turning block for main sheet from under deck to above deck.
269, eye plate, 1, mounting for jib block.
272, 180 deg sheet lead, 1, turn around for jib tweaker
280, sheet hook, 1, hooks for backstay and fore stay.
282, tang, 1, attach lowers to mast.
907, rigging screw, 4 hooks, 2 packs, upper and lowers to the deck.
I also build my own chain plates, so I don't order them from GBMY. Don does carry them if you need them. I also like the Ludwig mast better than the bantock mast, so I ordered 8 foot masts cut to 69' from Larry Ludwig, the other 28' or so is the main boom. Last time I made all my own boom vang, mast fitting. This time I ordered them from Larry. You can use the bantock mast, boom, and fittings from GBMY as well. They are good stuff and I have them on my IOM.
The back stay crane is made from 1/16 (.063') aluminum that I bought at the local hobby shop.
John"
1/03/2007
S45 Construction : Re: Woodie construction tip
"To: Star45@yahoogroups.com
From: 'Mitch Martin'
Sender: Star45@yahoogroups.com
Date: Wed, 03 Jan 2007 00:01:50 -0000
Subject: [Star45] Re: Woodie construction tip
Thanks for the encouragement! To answer your questions: I CAed the
1/32' bass wood to the frames and stringers. When I epoxy the
inside it will make the permanent bond. The layers of veneer are
cold molded with system 3 epoxy. I will have two layers on the
bottom and one on the sides, then glass with epoxy and .6 oz glass
cloth. Then one more layer of veneer. I do intend to laser some
patterns into the veneer. Then I'll finish with more clear epoxy
(probably west) and then varnish. Like I said, it's not going to be
light, but will look like a jewelery box when done.
--- In Star45@yahoogroups.com, Drake Dunivan
wrote:
>
> Thanks for that tip, its always nice to learn from
> someone elses mistakes :)
>
> What are you using for the adhesive? CA? Tightbond
> III?
>
> Hopefully everything else goes smoothly.
> drake
>
>
> --- Mitch Martin wrote:
>
> > I just made a mistake on my woodie and wanted to
> > pass along the tip.
> > You must install the side planks before installing
> > the botton planks.
> >
> > I tried to do the bottom first and it bent the thin
> > chine rails up and
> > now I have a wavy chine. It can be sanded out a
> > little but it's not
> > as good as I would have liked. Also, I have started
> > veneering the
> > hull with .035' maple and mohagany veneers. Should
> > be nice looking
> > when done.
> >
> > Best, Mitch
> >"
From: 'Mitch Martin'
Sender: Star45@yahoogroups.com
Date: Wed, 03 Jan 2007 00:01:50 -0000
Subject: [Star45] Re: Woodie construction tip
Thanks for the encouragement! To answer your questions: I CAed the
1/32' bass wood to the frames and stringers. When I epoxy the
inside it will make the permanent bond. The layers of veneer are
cold molded with system 3 epoxy. I will have two layers on the
bottom and one on the sides, then glass with epoxy and .6 oz glass
cloth. Then one more layer of veneer. I do intend to laser some
patterns into the veneer. Then I'll finish with more clear epoxy
(probably west) and then varnish. Like I said, it's not going to be
light, but will look like a jewelery box when done.
--- In Star45@yahoogroups.com, Drake Dunivan
wrote:
>
> Thanks for that tip, its always nice to learn from
> someone elses mistakes :)
>
> What are you using for the adhesive? CA? Tightbond
> III?
>
> Hopefully everything else goes smoothly.
> drake
>
>
> --- Mitch Martin
>
> > I just made a mistake on my woodie and wanted to
> > pass along the tip.
> > You must install the side planks before installing
> > the botton planks.
> >
> > I tried to do the bottom first and it bent the thin
> > chine rails up and
> > now I have a wavy chine. It can be sanded out a
> > little but it's not
> > as good as I would have liked. Also, I have started
> > veneering the
> > hull with .035' maple and mohagany veneers. Should
> > be nice looking
> > when done.
> >
> > Best, Mitch
> >"
Subscribe to:
Posts (Atom)