By Phil Geren
Of all the go fast stuff I have learned from tuning experts over the past year, the most valuable, and the thing that has provided the most additional boat speed for my 13#-3.5oz Star 45 (the "Fat Lady") is how to get the Jib's topping lift set right. I am doing much better in my racing since learning this.
The curve of the leech of the Jibsail MUST resemble as closely as possible the curve of the leeward surface of the Mainsail when sighting from the foredeck. If the Jib's leech is flatter or fuller your boat will not attain its speed potential while beating and reaching.
The topping lift enables you to get the curves aligned. Tightening the topping lift makes the Jib's leech fuller, more curved. Loosening the topping lift makes the Jib's leech flatter. With a little practice you can get the curves to be identical.
Here's how:
Pull the Mainsail in to the beating position; Swivel the Jib boom with your finger (apply only lateral force, no upward or downward force on the Jib boom) so that when you sight from the foredeck and look up and down the curve of the windward surface of the leech of the Jibsail it is superimposed on the curve of the back (leeward) surface of the Mainsail.
Are the curves identical? If not, is the Jib's leech more curved?
If it is, loosen the topping lift.
If the Jib's leech is flatter, tighten the topping lift.
Make small adjustments. This is very sensitive, and you can get it right if you persevere.
Recheck the need for adjustment after every few heats of racing or if you change anything else.
On sailboats EVERYTHING is related to everything else, and you will need to readjust periodically to maintain your added speed.
Don't have a topping lift? INSTALL ONE NOW! You won't believe the improvement!
10/08/2006

Sailing model boat | making your own keel bulb
From: "Jim Adams"
I made a plug from balsa and finished it to a smooth finish.
Using two aluminum pans (the kind that you throw away). Fill the first one with plaster took the balsa-bulb (well waxed) and placed it in the plaster half way in. I used two pins through the center to hold it down.
Let the plaster harden, then pull out the balsa-plug. Next put thin saran wrap over the mold and place the balsa-plug back in the mold. Now comes the fun part I used rubber bands to hold the plug in place (remember I had two pins that extend past the mold walls). Fill the second pan with plaster and lay the first on top, it is kind of messy but it works. When the second half hardens (about two hours) pull them apart. You will need to plug the holes at the ends on the sides and create small air path upward in the and a spur (looks like a funnel when you are done this needs to be big enough to pour in the lead) at the end.
==
Pouring molten lead is dangerous. The plaster mold which Jim Describes must be absoultely dry and free of moisture or the lead can spray out ot the spur.
Star 45 Construction | Class rules regarding Keels
Class specifications as of 2006:
7.0 KEELS AND BALLAST BULBS:
7.1 Keel will be of the style known as drop, and will be of the FIN and BULB type.
7.2 Keel fins may be solid or hollow and constructed of reinforced plastic, plastic laminates, fiberglass, wood or metal. (Note: Strength and integrity of the keel fins must be maintained whether built solid or hollow.) Keel fin shape is not specified but must follow the general shapes outlined on the reference drawing. However, keels will not be less than 6 inches nor more than 8 inches long (Fore and Aft) at the keel/hull junction, nor less than 4 inches nor more than 6 inches long (Fore and
Aft) at the keel/ballast bulb junction.
7.3 Keels, keel fins and ballast bulbs may be removable, however, they may not be changed, interchanged, substituted or otherwise manipulated once any heat or series of heats in which scores will be compiled, has started. Mechanically movable keels or ballast bulbs are specifically prohibited from use in Star 45 Class Yachts.
7.4 Ballast bulbs may be constructed of any material not prohibited by the AMYA. The actual shape is left to the builder's discretion, but will not exceed 9.75 (9 3/4) inches from the front of the keel bulb to the rearmost point of the keel or bulb.
7.5 Total drop (length) of the keel fin/ballast bulb combination will not exceed 11.5 (11 1/2) inches when measured from the keel/hull junction, before any fillers or streamlining is added.
7.6 Ballast may be made from any readily available material, such as poured lead, lead shot, etc. (Note: When using material such as lead shot, the mass must be solidified through the use of a bonding agent such as fiberglass or epoxy resin, plaster of paris, poured over and through in order to create a solid mass.)
7.7 Race directors may elect to use a template based on the construction plans to determine the keel length (depth).
7.8 Keel depth shall be measured from the center of the keel fin at the hull to the bottom of the ballast bulb. This measurement is from the edge of the bottom of the hull as it meets the side of the keel and should be determined during construction and before any fillet or fairing is added.
7.9 The Star 45 Class specifically excludes radio equipment, sail controls and batteries (power cells) from being considered ballast. This specification defines ballast as anything carried aboard the model for the main purpose of changing the weight distribution of the model and/or weight of the model. Ballast shall be fixed in place by gluing, fiberglassing, or bolting (bolts and screws).
7.9.1 Ballast may not be removed or relocated during any one regatta. The use of Velcro or similar quick release fasteners is prohibited as methods of mounting ballast.
Sailing Model, AMYA Star45 Class | Construction Deck(s), Hatches
from John Fisher:
Attaching deck to hull
John Fisher photographer
Hull with deck mounted:

John Fisher photographer
--------------------
HATCHES:
From Phil Geren:
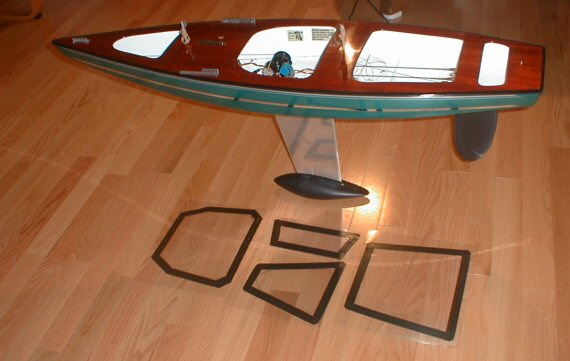
The simplest hatch cover solution I have found for Star 45 is to cut a piece out of Presentation Cover vinyl, which cut-out is shaped like the hatch opening but 1/4 or 3/8 of an inch larger on all sides. Then, apply electrician's tape (1/2 or 3/4" wide) all around the perifery, so that half the tape is on the vinyl and half is hanging over the edge.
Presentation Cover vinyl which I get at Office Depot is about 15 cents a sheet; it is about 0.008" thick; it is slightly over 8.5X11" in size; a full sheet weighs about 16 grams; it is stiff, but flexible; it is crystal clear, but if you want it opaque, just wet sand it with #400 grit wet or dry sandpaper.
Position the hatch cover over the hatch so that the tape extends evenly past the hatch opening an equal distance all around, and then just press on the tape to stick it to the deck. It's waterproof, durable.
You can make spares and stick them to another piece of vinyl and carry that with you to the races. That keeps spares nice and flat and keeps the tape's sticky side clean for future use. A set of these hatch covers usually lasts me all season. At lunch, I take one cover off to allow the boat to dry out, sticking the cover to a dry vinyl sheet to keep the tape's sticky side clean.
Photo is Star 45 #778, freshly rebuilt for the Nationals this year, and a set of covers on the floor next to her.
Phil Geren photographer
--
from Uncle Dave:
I pulled one of my old Star45's from the attic and have it here in my workshop. It has a fiberglass Sirius 45 hull, a aircraft ply deck and aluminum keel fin. Unfortunately it is not one of my finest examples of workmanship or painting. However I'll suffer the embarrassment and use if to show some one style of hatch construction.
Carrying around a model around out of the water is no big deal. Taking a model out of the water can be something else. You first need to hang onto the model. Then find a place to take hold to lift the model. This is one of the reasons I have used easily removable hatches. You can grab the model through the hatch, fingers under the deck and pick it up. Of course a thin ply deck the model deck and hatch construction needs to be strong enough to withstand pulling on the deck and lifting a twelve pound plus model. Therefore I braced my decks around hatch areas.
First I built a flanged frame for the hatch to sit in that also extended under the deck and attached to the deck bracing.

Then I built a hatch cover based on the size of the hatch. Initially the hatch cover was made to fit very loosely in the hatch. I then took some silicone (tub seal or similar) squeezed a bead around the shelf/lip of the hatch. The covering the hatch opening with food wrap poly sheeting I'd push the hatch cover in place down into the silicone. This made a nice water tight gasket around the edge of the hatch. After waiting a day I'd remove the plastic, trim and silicone that showed topside. With the silicone dry, pop the hatch cover in place and check the fit.

I placed a strip of magnetic tape on either end of the cover and on each end of the hatch frame.

When the hatch cover and hatch mag tapes touched they pulled together. This magnetic tape is neat stuff you can pop the cover in place and it will stay put.
Typically I made my hatches about 4"X5" giving me plenty of deck to the sheer.
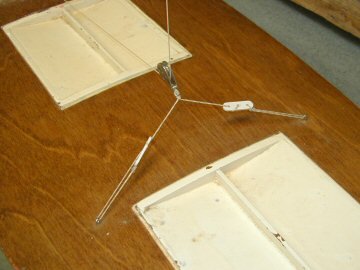
I heavy weather if the model might go over on beams end I'd cover the seams with tape just to be extra watertight. A 4X5 hatch gives room to get inside, adjust winch, radio etc, and to remove any water that got into the bilge while sailing.
S45 Construction Deck
4/19/2007 John Fisher just finished the deck rigging last night on his latest boat. The boat is set up pretty simple. Open loop with elastic. Winch is below deck, but the same rigging setup can be used with an on deck winch, just substitute a turning block for the through deck block.
The sheets go forward to a block on a bridle for the main sheet. The jib sheet and elastic go through a double block attached to the chain plate to keep things from rubbing on the mast, then through an adjustable double block forward. The jib sheet then goes back to a deck mounted block. The elastic is then hooked to a loop on deck. John put a hook in the elastic so he can release tension when in storage.
Chain plates and mast step are laid out per Scott Rowlands tuning guide.

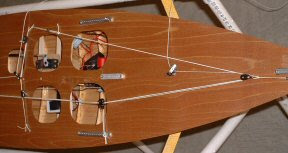

In tweaker photo bellow you can see the tweaker servo and winch mount.

The sheets go forward to a block on a bridle for the main sheet. The jib sheet and elastic go through a double block attached to the chain plate to keep things from rubbing on the mast, then through an adjustable double block forward. The jib sheet then goes back to a deck mounted block. The elastic is then hooked to a loop on deck. John put a hook in the elastic so he can release tension when in storage.
Chain plates and mast step are laid out per Scott Rowlands tuning guide.


In tweaker photo bellow you can see the tweaker servo and winch mount.

Sailing Model, AMYA Star45 Class | Decking
From Terry Forbes:
"The Star 45 boats that I have built have decks made from bass wood strips that are 1/4" X 1/16". I find them easy to use and easy to bend with out fracturing. I use thick ca to bond to hull frames and to the adjoining strip. When is have it all glued down, I sand with 120 grit and then 200. I use a soft rag to wipe off deck but leave the cracks filled with the sanding dust or "wood Flower" I then give it a thinned coat of slow cure epoxy. This first coat will soak into the wood completely. I then use un-thinned epoxy for the second and third coat, wet sanding and tack ragging between coats. If you want a really glassy deck, I use a finish coat of Captians Spar varnish. I have used this finish technique on full scale boats and all of my Kayaks. Very nice and durable finish. The decks go on easy and I try to stagger the strips one dark one light. I built a full scale star in the early 60's and had a striped planked deck. I like the look and it builds light. It keeps the hull true as sometimes when you add the deck using plywood it can cause it to move around. I will post some photos of my next hull as it comes to life. I have constructed a ships-way. I used the formers that are shown on the IMYA star plans. I now only have to cut the actual hull formers. I Stack cut 4 at a time on my trusty Dremmel Moto Shop Saw. I have added some lighting holes here and there. All in all I can have a hull lofted in 1 hr. and the sides on that evening using 20-min epoxy to coat the frames and the inside of the hull side. I first made my side peaces out of poster board. This allowed me to get the fit close and have a template to trace the sides for cutting. "
Dave's musings about setting up and adjusting sails on R/C model Boat.
Dry sailing -set up.
Place the model in a stand. Head the model into them wind.
Things that can be moved, and adjusted: Mast step. Mast rake. Boom vangs. Shrouds. stays. Jumper stays. Head stay/jib stay. Sail shape - loose foot. out-hauls.
Attach the sails to the mast.
Set the sail winches in fully trimmed position while allowing sheets to be slack.
Stand the mast with standing rigging attached in the center step position.
Hook the jib swivel into the middle slot of the jib rack. {The jib boom needs to clear the mast.}
Connect the side stays to the chain plates and adjust so the mast is straight and vertical.
Connect the back stay to the back stay fitting.
The jib stay and back stay will need adjusting to set the mast in vertical position.
Move the out-haul of the sails along the boom to give the sails to have some "belly". Pulling the sails out along the boom flattens their shape. The belly (or shape) of the sails will be determined later and the sail shape will be determined by how windy it is.
Where you attach the sheets to the booms will take into account the type and adjustments available for the sail control. The booms should be full out (90 degrees to the center line of the hull) when the SCU is full out and then the booms should be just about over the center line when fully trimmed in. ( I see 10 degrees as suggested angle to center line). The length of jib sheet trimmed and the length of main sheet trimmed is a factor in setting up the sail control so the sails are coordinated properly when sailing. The SCU handles a much longer main sheet than the jib sheet. The use of jib traveler and mainsheet traveler can help position the sails when fully trimmed in. Unless two servos (SCU's) are used a single SCU has the task of coordinating the positioning of the jib and main.
Turn on the R/C and run the SCU.
Test out SCU setting with the sails full out and fully trimmed.
With the mast set up and sails adjusted roughly in position it time to launch and sail.
--
Setting Sail on the water.
Before launching TURN on the radio on the boat. I have seen many models set loose to sail with the on board receiver and sail controls not tuned on and very unhappy skippers watching as their model sails away towards the horizon.
The initial rigging and sail settings are based in getting the model to sail a strait line while close hauled (sails trimmed in) and sailing up-wind.
Properly trimmed the rig will allow the model to sail it self in a straight line with just a minor tendency to "round-up" (i.e. sail itself dead into the wind). If or example you find you are constantly pulling the tiller (i.e. rudder) hard over to pull the model back on course to keep from heading in to the wind your model has weather helm which means your mast and jib must be re-positioned. When tacking if your model stall's into the wind and won't tack? Try different rig setting.
--
Setting Sails
The art of tuning the rig on a sail boat is detailed in books written for racing yachts and boats.
"DINGHY SAILS"
by Jeremy. Howard-Williams
"The Best of Sail Trim:
A Selection of Articles from Sail Magazine"
"Sail Trim: Theory And Practice"
by Peter Hahne
My observations and commentary on tuning are from an amateur and are at best suggestions not professional advice.
Observation Number One!!
Model sails that are single panel loose footed sails rely on the shape of the sail established by the gap between the boom and the foot of the sail. Model sails with "shape" sewn into the sail fabric still are loose footed. Also the lift of the boom also factors in determining the shape and performance of the sails.
Hauling a sail into the center line and at the same time pulling down on the sail can flatten the fabric and kill the sail shape. I like to use travelers to position the sail to the desired point near the center line. Then you can set the point of maximum driving force and not wreck the sail shape.
On a big boat the skipper can changer the suit of sails to match the cut of the sail with the wind conditions. In the case of a model a skipper can change where the out-haul is along the boom, light air adding belly to increase the drive, heavy air pulling the sail out further changing the sail's airfoil.
The jib and mainsail work as a system. A skipper has all manner of combinations that may be set relating the two sails. If the models did not have jib clubs they could overlap the mainsail. So model sailors have to adjust the "slot" between the jib and the main to get the maximum driving combined air foil.
In heavy air you may want to close the slot and ease the main so that the jib slightly back-winds the main to help the model sail flatter (less heeling).
Don't forget on a model it is easy to rake the mast fore and aft to trim the sailing characteristics to match wind conditions.
--
A digital camera can be a terrific diagnostic tool for seeing what is happening on your model. You can look at pictures and spot misadjustments. Bends in mast, wrinkles in sails etc. Does you model's mast rake forward down wind? Is the back stay bending the top of the mast. How are the jumper/jenny stays adjusted do they balance the tensions between the jib and the back stay?
--
The late Manny Costa of RI always stressed, change one thing at a time to see what changes. He also stressed sailing a pair of models. One model being tuned and sailing against the second to see if the single adjustment improved performance.
Round-Robin racing in pairs is an excellent way to evaluate how your model performs.
Subscribe to:
Posts (Atom)