Search This Blog

Showing posts with label sailing. Show all posts

11/06/2015

[Star45] Update on planking bottom with edge glueing.

[Star45] Update on planking bottom with edge glueing.

John Fisher is ready { 4/19/2007 } to glass his latest boat and is sharing how he planked it. His dad built a ply sided, cedar planked star using titebond II and it came out pretty light and stiff. With this information I started to build another hull using the same materials. He felt that edge gluing the planks added a lot of the strength to his boat. John didn't want to glue in extra wood to hold the pins to keep the planks in place for the glue to dry, so I combined two methods of planking. John liked the quickness of planking with CA and kicker, but it lacked stiffness when sanding the bottom before glassing. So he decided to edge glue the planks and then tack them in place to the frames with CA.

In this photo you can see where John put drops of CA on the planks. The wood is slightly darker.


It worked well. John has an edge glued bottom and he was able to plank it in one evening. To do this John first spray the frames with kicker, then apply titebond III to the edge of the planks. He then would hold the plank in place, tight against the previous plank, and apply a drop of CA to each frame to hold it in place. It did not matter where John started, bow, stern, or middle, but do make sure the CA has set up before moving to the next frame. Once the whole plank was in place he came back and wiped off the extra titebond. To fair the bottom to the sides he used a $10, 6" plane from home depot set at .010" depth of cut. It quickly removed the cedar and a little sanding finished the job.

John had one plank that was too thin that he had to remove, it was harder than expected. He had the use quite a bit of force to break the glue joint at each frame, so he is confident that this method is strong. John will also use this for balsa planked bottoms.

In photo # 10 you can see the stern still needs to be trimmed and sanded. John will probably use a saw to trim in close and then sand to fair it.

4/20/2007

Star 45 DECK John Fisher 4/19/2007

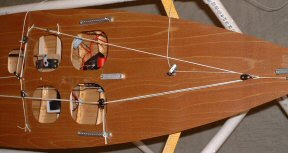
4/19/2007 John Fisher just finished the deck rigging last night on his latest boat. The boat is set up pretty simple. Open loop with elastic. Winch is below deck, but the same rigging setup can be used with an on deck winch, just substitute a turning block for the through deck block.

The sheets go forward to a block on a bridle for the main sheet. The jib sheet and elastic go through a double block attached to the chain plate to keep things from rubbing on the mast, then through an adjustable double block forward. The jib sheet then goes back to a deck mounted block. The elastic is then hooked to a loop on deck. John put a hook in the elastic so he can release tension when in storage.

Chain plates and mast step are laid out per Scott Rowlands tuning guide.


In tweaker photo bellow you can see the tweaker servo and winch mount.

10/08/2006

Star 45 Construction Planking with edge glueing

[Star45] Update on planking bottom with edge glueing.

John Fisher is ready { 4/19/2007 } to glass his latest boat and is sharing how he planked it. His dad built a ply sided, cedar planked star using titebond II and it came out pretty light and stiff. With this information I started to build another hull using the same materials. He felt that edge gluing the planks added a lot of the strength to his boat. John didn't want to glue in extra wood to hold the pins to keep the planks in place for the glue to dry, so I combined two methods of planking. John liked the quickness of planking with CA and kicker, but it lacked stiffness when sanding the bottom before glassing. So he decided to edge glue the planks and then tack them in place to the frames with CA.

In this photo you can see where John put drops of CA on the planks. The wood is slightly darker.


It worked well. John has an edge glued bottom and he was able to plank it in one evening. To do this John first spray the frames with kicker, then apply titebond III to the edge of the planks. He then would hold the plank in place, tight against the previous plank, and apply a drop of CA to each frame to hold it in place. It did not matter where John started, bow, stern, or middle, but do make sure the CA has set up before moving to the next frame. Once the whole plank was in place he came back and wiped off the extra titebond. To fair the bottom to the sides he used a $10, 6" plane from home depot set at .010" depth of cut. It quickly removed the cedar and a little sanding finished the job.

John had one plank that was too thin that he had to remove, it was harder than expected. He had the use quite a bit of force to break the glue joint at each frame, so he is confident that this method is strong. John will also use this for balsa planked bottoms.

In photo # 10 you can see the stern still needs to be trimmed and sanded. John will probably use a saw to trim in close and then sand to fair it.
Star 45 Keel fins building options, Star45

{Rule7.2}
Keel fins may be solid or hollow and constructed of reinforced plastic, plastic laminates, fiberglass, wood or metal. (Note: Strength and integrity of the keel fins must be maintained whether built solid or hollow.) Keel fin shape is not specified but must follow the general shapes outlined on the reference drawing. However, keels will not be less than 6 inches nor more than 8 inches long (Fore and Aft) at the keel/hull junction, nor less than 4 inches nor more than 6 inches long (Fore and Aft) at the keel/ballast bulb junction.

--
The Mainwaring Keel shape is a fine choice!
--

John Fisher suggests:

The quickest and easiest way to make them if you have access to a metal band saw is to draw the keel in CAD, then print it out. Glue that to a sheet of 3/32 aluminum with 3m77 and cut it to shape.

You could also do the same thing with sheets of plywood and layer it to achive a airfoil shape. Each layer should be smaller than the last and then sand to blend the layers. Could also make a good cad project.

Another way is to cut the shape in two pcs of 1/16 ply, then tape the edges together. Insert a couple of threaded rods between the two sheets for attachment. Then fill with epoxy and microballoons. Using this method you should also glass the outside for additional stiffness. There are photo's of making a rudder like this on the blog site.

--

S45 Construction Deck

4/19/2007 John Fisher just finished the deck rigging last night on his latest boat. The boat is set up pretty simple. Open loop with elastic. Winch is below deck, but the same rigging setup can be used with an on deck winch, just substitute a turning block for the through deck block.

The sheets go forward to a block on a bridle for the main sheet. The jib sheet and elastic go through a double block attached to the chain plate to keep things from rubbing on the mast, then through an adjustable double block forward. The jib sheet then goes back to a deck mounted block. The elastic is then hooked to a loop on deck. John put a hook in the elastic so he can release tension when in storage.

Chain plates and mast step are laid out per Scott Rowlands tuning guide.


In tweaker photo bellow you can see the tweaker servo and winch mount.