Hannah Kemlo, an MSc student in Ship Science at Southampton University, tested an IOM "A" rig in the Southampton low-speed wind tunnel for her project in July 2006. One of the tests included varying the gap between the jib foot and the deck.
http://www.onemetre.net/Design/WindHanJibDeck/WindHanDeck.htm
11/01/2015
Lester Gilbert on sail making for model sail boats
Model Boat journal
Lester Gilbert on understanding of sail making for model sail boats
Lester Gilbert wrote:
For anyone interested in sailmaking, I've just finished editing Larry Robinson's "Making Model Yacht Sails" (part 1 only) booklet and have published it as an "international" edition. I've done this, not to get rich ('cos this isn't going to happen to either me or Larry or anyone else connected with this enterprise!), but because I've spoken to a lot of sailors who want to make sails but don't know the "right" techniques, and who are being misled by incorrect accounts of how this might be done.
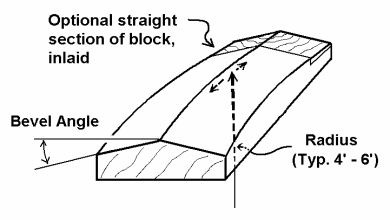
A sail block
(Illustration from Larry Robinson's "Making Model Yacht Sails")
From my understanding of sail making, there are two ideas I want to contradict.
The first idea is that you can make sails by accurately cutting a curve on a panel, and then attaching it (stitching, gluing) to another panel. Well, while you might be able to cut a good curve some of the time, your fingers just don't have laser accuracy in them to stick A to B and you'll hardly ever obtain reproducible or reliable results. (It might be possible to butt-join the curved edge to another curved edge with a little more reliability, but this doesn't yield what the Equipment Rules of Sailing define to be a seam. Such a sail couldn't be used in sanctioned IOM competition, though it would be OK in a development class.)
The second idea is that you can drape your panels over a "camber board" and get a nice shape that way. Well, let me be clear about what I'm knocking here. I take a "camber board" to be a length of curved surface, where the curve is like the surface of a cylinder. In this case, your panelled sail will have exactly the same shape as a single un-panelled sail and, if you wanted a three-dimensional shape, you've wasted your time (though the result certainly looks the part).
Larry's booklet is the only source I know which carefully explains the use and construction of a sail block. I am sure that this is really the only way (in your garage, please, not in some specialist workshop!) to make professional sails, to obtain reliable and reproducible three-dimensional shaping, and to be able to tweak and change your shaping as you learn about the whole business.
(Warning: Y'all should know I have ten thumbs and have never made a sail yet. What I have done carefully is to watch and talk to those who do, both professionally and as home builders, and measure the results. Making Larry's booklet available internationally is my way of telling you what I've learned.)
Bob Wells will be able to ship this within the USA, and I expect that it will also be available from Don Ginthner at GBMY. For worldwide sales, contact SAILSetc. Bob Wells' e-mail is "bob" at "islandinet.com", GBMY is "rcsailing" at "gbmy.com", and SAILSetc can be contacted through "sales" at "sailsetc.com".
I've attempted an analysis of how blocks work on a new page, Sail blocks analysis, and have a new spreadsheet there to help.
attaching main to slotted mast | Larry Ludwig via yahoogroups.com
You use a bolt rope main just as you would on a full sized boat. You are correct that you use something as a bolt rope in the luff (hem) of the mainsail. We use "weedeater" line. It is stiff but flexible and slides in the sail in seconds and you are ready to go. It not only makes changing sails a breeze (pardon the pun) but gives you THE best aerodynamic flow from across the mast onto the sail. The earlier that the airflows smoothly aft of the mast, the more effective sail area you have, that is what makes the airfoil shape an advantage.
7.0 KEELS AND BALLAST BULBS: class specs.
Class specifications as of 2006:
7.0 KEELS AND BALLAST BULBS:
7.1 Keel will be of the style known as drop, and will be of the FIN and BULB type.
7.2 Keel fins may be solid or hollow and constructed of reinforced plastic, plastic laminates, fiberglass, wood or metal. (Note: Strength and integrity of the keel fins must be maintained whether built solid or hollow.) Keel fin shape is not specified but must follow the general shapes outlined on the reference drawing. However, keels will not be less than 6 inches nor more than 8 inches long (Fore and Aft) at the keel/hull junction, nor less than 4 inches nor more than 6 inches long (Fore and
Aft) at the keel/ballast bulb junction.
7.3 Keels, keel fins and ballast bulbs may be removable, however, they may not be changed, interchanged, substituted or otherwise manipulated once any heat or series of heats in which scores will be compiled, has started. Mechanically movable keels or ballast bulbs are specifically prohibited from use in Star 45 Class Yachts.
7.4 Ballast bulbs may be constructed of any material not prohibited by the AMYA. The actual shape is left to the builder's discretion, but will not exceed 9.75 (9 3/4) inches from the front of the keel bulb to the rearmost point of the keel or bulb.
7.5 Total drop (length) of the keel fin/ballast bulb combination will not exceed 11.5 (11 1/2) inches when measured from the keel/hull junction, before any fillers or streamlining is added.
7.6 Ballast may be made from any readily available material, such as poured lead, lead shot, etc. (Note: When using material such as lead shot, the mass must be solidified through the use of a bonding agent such as fiberglass or epoxy resin, plaster of paris, poured over and through in order to create a solid mass.)
7.7 Race directors may elect to use a template based on the construction plans to determine the keel length (depth).
7.8 Keel depth shall be measured from the center of the keel fin at the hull to the bottom of the ballast bulb. This measurement is from the edge of the bottom of the hull as it meets the side of the keel and should be determined during construction and before any fillet or fairing is added.
7.9 The Star 45 Class specifically excludes radio equipment, sail controls and batteries (power cells) from being considered ballast. This specification defines ballast as anything carried aboard the model for the main purpose of changing the weight distribution of the model and/or weight of the model. Ballast shall be fixed in place by gluing, fiberglassing, or bolting (bolts and screws).
7.9.1 Ballast may not be removed or relocated during any one regatta. The use of Velcro or similar quick release fasteners is prohibited as methods of mounting ballast.
Construction Star 45, Sail Making, colored sails, sail material
Apr 2007 Subject: [Star45] Sails - colors
--
From: "Larry Ludwig" mailing list Star45@yahoogroups.com
You can have colored sails. You can make your own from ripstop and the colors are all available. The material is inexpensive enough that even if you do botch the first few attempts it's not going to set you back more than $10.00
Learning to make sails teachs you more about TRIMMING sails and the way they take a "set" than sailing a boat ever will.
If you set your mainsail luff as a bolt rope (and you should IMHO) then it takes only a few seconds to pop off your mast head or foot, slide out one sail and slide in the other. Then if your jib is setup as a hook attachment to a hole in the mast, you unhook from the deck, unhook from the mast and voila, you are ready to hook both ends of the 2nd sail and you are complete. You should be able to change the sails on your boat in 2 minutes if you are properly set up. Of course, using a 2nd mast and complete rig is even faster. If you setup so your turnbuckles remain on the deck, then they are ready to go regardless of which rig you chose, and you reduce the cost of a 2nd rig by $40 right there.
Don't discount ripstop sails too much. They may not be all the rage... but I promise you the skipper skill factor is WAY more important than the sail material. I have rip stop sails here that have lasted 20 years, if they are well cared for, they will last. Skippers familiar with the Vic class will remember a Regional Regatta being won with a stock ripstop mainsail last year ( I think it was)
Give it a shot, you won't be sorry you did. *and it DOES look very nice on your boat.
--
From: "J Fisher" Sender: Star45@yahoogroups.com Subject: Re: [Star45] Sails - colors
I have seen people in the 914 fleet use colored markers to color sails. I think it was mostly to tell the boats apart, but there were some interesting designs. You could probably paint your sails as well to get color.
--
From: jfisher@wildblue.net I have made a lot of sail and could put together a step by step to make sails.
I use mylar which I buy from www.McMaster.com. They only carry clear, so I sand it to make it translucent. It colors well with markers so that would be one way to make colored sails. To make sails you can use the sail block based on the method provided on the star 45 yahoo groups by John Whitford or you can use the block from great basin, which is based on the Sweede Johnson sail block. I have used the sweede block with good results.
--
From: "Larry Ludwig" Sender: Star45@yahoogroups.com Subject: RE: [Star45] Sails - colors
You can make panelled sails, but it is not required. You can get PLENTY of use out of a single panelled sail. They actually have some advantages in high winds because of the less draught. Also, but putting in the luff curve and using a bolt-rope main, you do have a sail with some draught to it, not just a flat sheet of cloth. The block method works fine, but also.. is not required. Basically you cut the bottom panel seam flat, and draw your airfoil MAC (mean aerodynamic chord) and cut it with a #9 X-acto or scissors. Use seamstress tape and overstitch. Do the same thing with the luff curve, and hem the foot and leech and you are about there. Oversew some corner panels, tack on some batten pockets and thread in a piece of weed-eater line up the hem of the luff and you are ready to put on your class markings and numbers. Grommets in the corners are installed either with a seamstress tool or they could be ordered from Don Ginther at GBMY if he is still shipping, he was in the process of suspending operations.
Where to find the material? Nylon ripstop is inexpensive... typically $6-$7 (x 38-50" long bolt) a yard at LONDON's Fabrics or HANCOCK Fabrics, sometimes you will find it at HOBBY LOBBY retail stores, but if you check your local fabric store you will most likely come up with some in various colors. Also using contrasting thread colors can make the sail more attractive. Start with a single panel sail and go through all the steps. When you are ready to start making paneled sails... don't be afraid to make them out of paper first. Typical brown paper can be cut and taped together and makes a perfect mock up of the sail for pennies.
--
From: "Al Stein" Sender: Star45@yahoogroups.com Subject: [Star45] Re: Sails - colors
I think I got mine from Potomac Sailmakers in Alexandria, Virginia... I bought yellow and orange, but they had a bunch of different colors in spinnaker cloth, and very light weight and airtight it is.
It's fairly stiff, too, for as light as it is -- something well under an ounce per yard. Price about the same as Larry experienced... less than $10 a running yard from a BIG WIDE bolt (can't remenber exact width, but it was much wider than normal fabric store goods.
--
From: "John & Kelly" Sender: Star45@yahoogroups.com Subject: RE: [Star45] Sails - colors
I have built US One Meter sails from spinnaker cloth purchased from Sailrite.
I used .5 oz which is only available in red, white, and blue, but .75 oz is available in a multitude of colors.
The part I like best about these materials is you can buy a role of C3 spinnaker tape (pricey at $25.00) and build a set of sails without sewing a stitch.
They actually use C3 to tape together the body seams of full scale spinnakers so I'm pretty sure it can take just about anything a model can throw at it.
I've built two sets of sails and only used about 10% of my role of tape so that $25.00 will go a long way.
At about $12.00 a yard, spinnaker cloth is twice the cost of fabric store ripstop, but spinnaker cloth is coated with resin that makes it far more stable and eliminates all porosity (wind can blow right through ripstop). I also haven't tried using C3 on plain ripstop, so I can't say how the bond will hold up.
For cutting fabric like this I'd use a hot knife. I bought a $4.00 40watt soldering iron at the local mega-mart, removed the tip, hammered it flat, and put it back in. Cutting works best over a smooth heat resistant surface. I use my glass topped kitchen table (when my wife's not home).
--
--
From: "Larry Ludwig"
You can have colored sails. You can make your own from ripstop and the colors are all available. The material is inexpensive enough that even if you do botch the first few attempts it's not going to set you back more than $10.00
Learning to make sails teachs you more about TRIMMING sails and the way they take a "set" than sailing a boat ever will.
If you set your mainsail luff as a bolt rope (and you should IMHO) then it takes only a few seconds to pop off your mast head or foot, slide out one sail and slide in the other. Then if your jib is setup as a hook attachment to a hole in the mast, you unhook from the deck, unhook from the mast and voila, you are ready to hook both ends of the 2nd sail and you are complete. You should be able to change the sails on your boat in 2 minutes if you are properly set up. Of course, using a 2nd mast and complete rig is even faster. If you setup so your turnbuckles remain on the deck, then they are ready to go regardless of which rig you chose, and you reduce the cost of a 2nd rig by $40 right there.
Don't discount ripstop sails too much. They may not be all the rage... but I promise you the skipper skill factor is WAY more important than the sail material. I have rip stop sails here that have lasted 20 years, if they are well cared for, they will last. Skippers familiar with the Vic class will remember a Regional Regatta being won with a stock ripstop mainsail last year ( I think it was)
Give it a shot, you won't be sorry you did. *and it DOES look very nice on your boat.
--
From: "J Fisher"
I have seen people in the 914 fleet use colored markers to color sails. I think it was mostly to tell the boats apart, but there were some interesting designs. You could probably paint your sails as well to get color.
--
From: jfisher@wildblue.net I have made a lot of sail and could put together a step by step to make sails.
I use mylar which I buy from www.McMaster.com. They only carry clear, so I sand it to make it translucent. It colors well with markers so that would be one way to make colored sails. To make sails you can use the sail block based on the method provided on the star 45 yahoo groups by John Whitford or you can use the block from great basin, which is based on the Sweede Johnson sail block. I have used the sweede block with good results.
--
From: "Larry Ludwig"
You can make panelled sails, but it is not required. You can get PLENTY of use out of a single panelled sail. They actually have some advantages in high winds because of the less draught. Also, but putting in the luff curve and using a bolt-rope main, you do have a sail with some draught to it, not just a flat sheet of cloth. The block method works fine, but also.. is not required. Basically you cut the bottom panel seam flat, and draw your airfoil MAC (mean aerodynamic chord) and cut it with a #9 X-acto or scissors. Use seamstress tape and overstitch. Do the same thing with the luff curve, and hem the foot and leech and you are about there. Oversew some corner panels, tack on some batten pockets and thread in a piece of weed-eater line up the hem of the luff and you are ready to put on your class markings and numbers. Grommets in the corners are installed either with a seamstress tool or they could be ordered from Don Ginther at GBMY if he is still shipping, he was in the process of suspending operations.
Where to find the material? Nylon ripstop is inexpensive... typically $6-$7 (x 38-50" long bolt) a yard at LONDON's Fabrics or HANCOCK Fabrics, sometimes you will find it at HOBBY LOBBY retail stores, but if you check your local fabric store you will most likely come up with some in various colors. Also using contrasting thread colors can make the sail more attractive. Start with a single panel sail and go through all the steps. When you are ready to start making paneled sails... don't be afraid to make them out of paper first. Typical brown paper can be cut and taped together and makes a perfect mock up of the sail for pennies.
--
From: "Al Stein"
I think I got mine from Potomac Sailmakers in Alexandria, Virginia... I bought yellow and orange, but they had a bunch of different colors in spinnaker cloth, and very light weight and airtight it is.
It's fairly stiff, too, for as light as it is -- something well under an ounce per yard. Price about the same as Larry experienced... less than $10 a running yard from a BIG WIDE bolt (can't remenber exact width, but it was much wider than normal fabric store goods.
--
From: "John & Kelly"
I have built US One Meter sails from spinnaker cloth purchased from Sailrite.
I used .5 oz which is only available in red, white, and blue, but .75 oz is available in a multitude of colors.
The part I like best about these materials is you can buy a role of C3 spinnaker tape (pricey at $25.00) and build a set of sails without sewing a stitch.
They actually use C3 to tape together the body seams of full scale spinnakers so I'm pretty sure it can take just about anything a model can throw at it.
I've built two sets of sails and only used about 10% of my role of tape so that $25.00 will go a long way.
At about $12.00 a yard, spinnaker cloth is twice the cost of fabric store ripstop, but spinnaker cloth is coated with resin that makes it far more stable and eliminates all porosity (wind can blow right through ripstop). I also haven't tried using C3 on plain ripstop, so I can't say how the bond will hold up.
For cutting fabric like this I'd use a hot knife. I bought a $4.00 40watt soldering iron at the local mega-mart, removed the tip, hammered it flat, and put it back in. Cutting works best over a smooth heat resistant surface. I use my glass topped kitchen table (when my wife's not home).
--
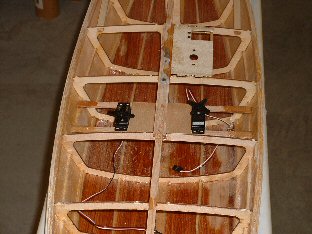
Keel Tubes installation -- S45 cedar hull -- John Fisher


Date: Fri, 9 Feb 2007 17:18:41 -0700 (Mountain Standard Time)
From: "J Fisher"
To: "Dave mainwaring"
Subject: Photo's of keel tube install on cedar hull
Dave, I am attaching 4 photo's showing the radio tray , keel tubes glued in , how I made the keel tubes , and the keel tubes installed .
I used brass tubes on this hull and found that they were very easy to align due to the snug fit in the drilled holes. Since this fin had the standard bolts on it I put a shoulder on the inside by soldering together a couple of different sized tubes. Photo shows one already soldered and the other before soldering. I will then take an aluminum rod and thread the end to hold the keel.
I then glued the tubes in the hull using JB weld since it has very good strength for bonding metal. That is the silver colored epoxy. Time will tell if it was a good choice.
The radio tray was simply two 1/8" X 3/8" spruce strips glued in. I also added a vertical reinforcing PC in the middle. All the joints were strengthened with a small PC of fiberglass that was held in place by 3M77 while gluing. I add the glass to make sure the joints never come apart. On one boat I had to cut the radio tray out when I moved it since the glassed glue joint was so strong.
This boat will have a deck mounted winch like the first 3 that I built.
John
Turbulators by Lester Gilbert {Turbulator on keel fin}
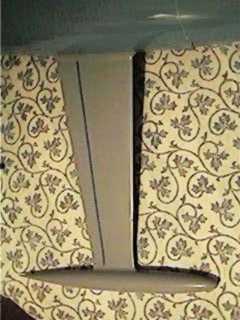
Turbulators

Following the theoretical analysis of the boundary layer and the roughness needed to stimulate BL flow transition, I've experimented with a simple turbulator (turbulence stimulator) on my Ikon fin. Until recently, I used a SAILSetc fin with 7% thickness ratio, and tried turbulators before without really noticing much difference. I've now fitted a new fin with 6% thickness ratio, and wondered if the thinner fin might be somewhat more prone to early stall while beating. So I tried a turbulator again.
Turbulator on fin
The first photo shows the general position of the turbulator strip at 70% of chord, the position Graham Bantock recommended as being appropriate for the foil section he uses. The second photo shows a detail view of the strip, cut with pinking scissors to give a zig-zag about 1.5 mm wide. The strip illustrated is about .010" thick, approximately .25 mm. This is pretty much the minimum thickness needed towards the fin tip according to the roughness spreadsheet, and may be a little too thin for the chord at the fin root. I have plans to experiment with a slightly thicker turbulator on the upper part of the fin. The line drawn on the fin marks the 70% chord position, so the turbulator starts its stimulation with its peaks placed along this line. In an earlier trial I had the turbulator at 50% of chord, and this seemed to give rather more of a drag penalty without a noticeable improvement in lift or postponement of stall.
Turbulator detail
I've found the results to be quite pleasing. The turbulator doesn't seem to have hurt performance very much on the run; that is, the drag penalty seems acceptable. But I feel that the boat is now more effective on the wind, more willing to point. So the fin seems able to either generate a little more lift than before, or to do it more efficiently. Also, the boat doesn't seem quite so prone to stalling during low speed manoeuvres, like creeping towards the starting line with sails sheeted out and not too much way.
2006-07-11
©2008 Lester Gilbert
Subscribe to:
Posts (Atom)