Thinning West System Epoxy by Brian Knight
http://www.seqair.com/skunkworks/Glues/WestSystem/Thinning/Thinning.html
"This article appeared in the Fall 1999 issue of Epoxyworks, published by Gougeon Brothers, manufacturers of the West System epoxies." Brian Knight thanks Gougeon for permission to publish this in the December 1999 Falco Builders Letter. "
Here are key excerpts for your review and discussion:
"With wood, the best method of thinning epoxy with heat is to warm the wood and have the resin and hardener at room temperature. Mix the components and apply the mixture to the warm wood surface. Remove the heat source just before the epoxy is applied. When the epoxy mixture comes in contact with the warm wood, it gets warm and its viscosity becomes lower. As the temperature of the wood falls, the thin epoxy is drawn in deeply before it begins to gel. By heating the substrate instead of the components, you get the best of both worlds-low viscosity epoxy on the work surface and longer working time in the mixing pot."
Thinning epoxy with solvent
Adding solvent is a quick, simple method of thinning epoxy, but unlike using heat to thin it, the strength and moisture resistance of the cured epoxy are drastically affected. Below are some of the effects adding solvent has on West System epoxy. While there are a large number of chemicals available to thin epoxy, we selected acetone, lacquer thinner and denatured alcohol for this discussion because they are commonly available and do a good job of reducing viscosity. Additionally, these solvents evaporate quickly and are less likely to be trapped in the cured epoxy-an important characteristic. For a variety of reasons, fast evaporating lacquer thinner appears to be more appropriate for thinning purposes than acetone or alcohol.
10/16/2008
10/15/2008
So you want to build a sailing model
Find plans for a sailing model, buy or find on-line.
Join a model boat forum for advice.
Buy or borrow books on boat building.
Decide on type of planking and wood to be used to build the model.
Set aside a work space for building.
Review the bill of materials need to build the model and buy the materials.
Order deck and mast fittings.
Order mast (if you are buying the mast) and order sails (or sail material).
Choose the radio system, buy a sail control unit, Order keel bulb or get advice and discuss issues of building your own.
While the hull is under construction build:
Keel fin and ballast bulb
Rudder assembly
Make or assemble spars ( mast and booms)
Build cradle to hold boat under construction and when finished.
Test Radio System and sail control unit
After hull is planked:
Install keel trunk or make provisions for mounting keel.
Install radio and sail control unit, Then remove while construction continues.
Construct deck and hatches
Install/mount deck fittings
Test access to radio and sail control inside the hull.
Provide a exit guide for radio antenna so it can be attached to mast or stays.
Install power switch for turning off batteries
Test mount keel
Paint hull, rudder and keel
Assemble hull, rudder and keel
Set up mast and boom.
Install radio controls.
Check running rigging.
Attach Sails
dry sail model
--
Sail
Display
Storage
Model Sailboat Plans on line


Most browsers will allow you to right click and open the jpg images. You can then save them to your machine.
This set of plans are based on drawing from John Fisher 2006. John may have new and updated drawings available. Check with http://groups.yahoo.com/search?query=star45 membership required.
I want to thank J. Herrmann, www.graphicLanguageOnline.com, for his assistance in converting pdf's to jpg drawing, adding color to the templates and adding the grid to the final images
You can print these drawing to many different sizes.They are not necessarily to scale.
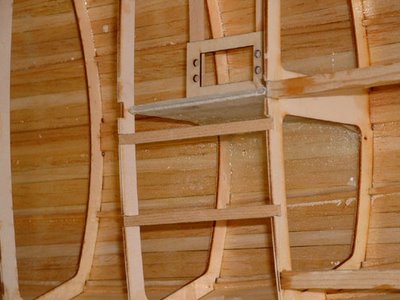
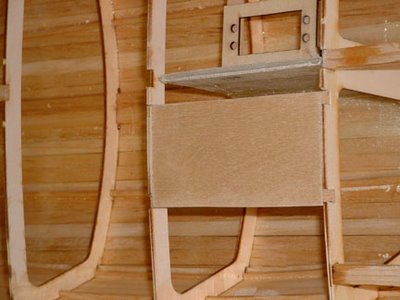
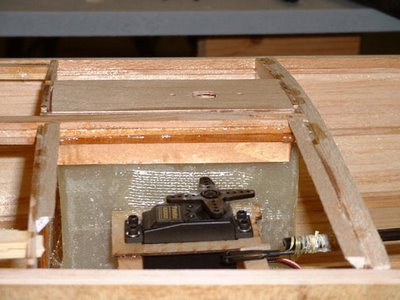
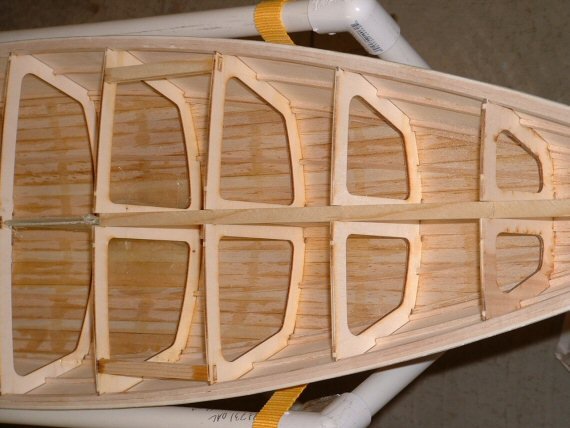
Inside a R/C sailing model hull
John Fisher photographer and builder!
Radio Board stringers between bulkheads
(Note the method of keel support using these stringers)
Radio Board
Rudder Servo
Mast support (inside hull)


Radio Board stringers between bulkheads
(Note the method of keel support using these stringers)

Radio Board

Rudder Servo

Mast support (inside hull)

S45 sail boat Rigging Bill of Material from John Fisher
To:Star45@yahoogroups.com
From: 'J Fisher'jfisher@wildblue.net
Sender: Star45@yahoogroups.com
Date: Wed, 3 Jan 2007 21:02:38 -0700 (Mountain Standard Time)
Subject: Re: [Star45] Deck rigging and such
Here is the list on the star 45 yahoo groups for rigging. I am using the following for my next couple of builds:
GBMY item #, description, qty, purpose
019, 3/8' alloy tube, 1, Jib boom
034, Hales single block, 2, main and jib sheets
146, tapered drain plug, 1, plug in transom
182, Z sheet hook, 2, sheet ends/boom attachment
202, large bowsie, 1, back stay/forestay with 80 lb Dacron, order small ones if using spektra
206, O-rings, 1, hold the Z hooks to the boom.
254, double block, 2, main sheet and jib sheet adjuster
255, sheet exit, 1, turning block for main sheet from under deck to above deck.
269, eye plate, 1, mounting for jib block.
272, 180 deg sheet lead, 1, turn around for jib tweaker
280, sheet hook, 1, hooks for backstay and fore stay.
282, tang, 1, attach lowers to mast.
907, rigging screw, 4 hooks, 2 packs, upper and lowers to the deck.
I also build my own chain plates, so I don't order them from GBMY. Don does carry them if you need them. I also like the Ludwig mast better than the bantock mast, so I ordered 8 foot masts cut to 69' from Larry Ludwig, the other 28' or so is the main boom. Last time I made all my own boom vang, mast fitting. This time I ordered them from Larry. You can use the bantock mast, boom, and fittings from GBMY as well. They are good stuff and I have them on my IOM.
The back stay crane is made from 1/16 (.063') aluminum that I bought at the local hobby shop.
John Fisher
---

photo's courtesy of "Larry Ludwig" at www.LudwigRCYachts.com, Ludwig Mfg.
Jib Tweakers
Jib tweaker with swing arm sail control unit:

Adding a servo to the end of the jib sheet allows the jib to be "tweaked" by changing the effective length of the sheet while under sail. The challenge is to set the servo to mid point when setting the model up prior to sailing.
Tweaker with drum type sail control unit.

___________________________________
A jib twicher is a rig that pulls the jib boom to port or to starboard when sailing down wind.

These to devices are often confused with each other :)
10/08/2008
The following are a compilation of Lester Gilbert's materials, materials of others"
The Lester Gilbert pages are published with his permission and are "only intended for educational, model building guidance and discussion purposes User beware the writers assume no responsibility for anything. If you'd like to reprint, copy, or link to anything, please attribute words, diagrams, photos, spreadsheets, and software carefully and obtain permissions where appropriate so others know who was the source. The content is a compilation of my materials, materials of others and Lester Gilbert."
Lester Gilbert is at Learning Societies Lab, University of Southampton, Southampton SO17 1BJ, United Kingdom he may be reached by email at lg11@soton.ac

Adjusting the wind tunnel model
Lester Gilbert is at Learning Societies Lab, University of Southampton, Southampton SO17 1BJ, United Kingdom he may be reached by email at lg11@soton.ac

Adjusting the wind tunnel model
Subscribe to:
Posts (Atom)