This construction guide will suggest one or more ways to build your boat. With a basic knowledge of fiberglass and model building the kit builder will find boat building easy and fun. Use your personal knowledge and skills to build your model in a customized manner appropriate to your skill level.
There is nothing sacred about the methods in this booklet; there are many other equally good ways to do it.. .Fiberglass models are adult projects. Keep components and resins out of the reach of children.
6/29/2006
MODEL YACHT BUILDERS GUIDE "SOME ADDITIONAL HINTS"
Your fiberglass hull and deck probably are fresh from the mold. If so, they may have mold release still on the surface. PVA mold release looks like a flaky film and washes off 'with water. Wax and other mold releases will require scrubbing with detergent. If the edges of the parts have not been trimmed, trim them when the time comes for assembly.
Stick with using name brand products in your model building. Look for proven modelers products and industrial adhesives.
Very important re-fit and trial fit all parts before installing them. Don't install anything until you check your building plan and building schedule.(Your building schedule is the list you make of all components to be assembled before you begin to build to make sure you don't put something together in the way of something else. ) For example, you must be able to install the radio gear into the hull so don' t assemble components in such a way that it, will block installation of that radio gear.
MODEL YACHT BUILDERS GUIDE "FIBERGLASS HULLS"
Fiberglass boats; hulls are available in different forms. A one piece hull supplied mold in one piece. A two piece hull has two half hulls which must be joined together by the builder. Hulls may come with edges reinforced and a mounting lip molded about the sheer edge. Often they come with a "straight" sheer; this means the modeled must put in a shelf or sheer clamp or gunwale strip in order to mount the deck and support the edge of the hull.
In the two piece hull trim the halves carefully. Hold the parts rigidly together with clamps or tape and laminate in a strip of fiberglass: across the inside joint between the halves. When the resin cures you will. have a one piece hull.
Before proceeding further you will need to build a cradle to hold the model in place while you finish building it.
If your hull is of the straight sheer type it will require a deck mounting shelf to be installed; proceed as follows. After trimming the sheer, laminate two strips of 1/8 x 3/8 spruce about the inside edge. This will give you a 1/4 plus wide shelf to support the deck. You may use other sizes and woods to fit your individual needs. Take care not to distort the hull at this stage. if necessary brace the hull externally to hold its shape. Do not fry to force the wood strips too tightly to the hull. This will distort the hull at the clamping points. Use a thixotropic resin to bridge the small gaps between the wood strips and the fiberglass. Another method is to use a small strip of fiberglass between the wood strip and hull with the saturated glass strip bonding to both the hull and the wood. On a racing model, remember weight should be kept at a minimum. Choose your building technique and materials with this in mind.
Locate the points at which the chain plates and various fittings will be attached. to the hull and deck. Locate and install load spreaders and back up blocks for such items as shrouds (stays), head stay or job rack, mast step, backstay and any other item which will need to be fastened after the boat is assembled. These back up blocks or load spreaders are generally blocks of light weight wood such as spruce which are bonded to the hull or deck so that when the fitting is screwed or bolted down to the fiberglass the pull is taken up by the block of wood. Remember that unless the load is widely spread out fiberglass, especially thin GRP as in models, can not stand tension loads. Arrange the blocks to spread the load or to put the fiberglass in compression loading.
The bottom of our model must support the weight of a heavy keel located on a long lever-like fin so it will need some sort of strengthening or "load spreading". If the keel is bolted on, the hull will need a keelson installed inside the hull. The keelson is sometimes called the hog or occasionally the keel. To do this you laminate a 1 inch wide strip of glass tape down the centerline inside the hull bottom. While this is still wet laminate three or more 1/8 by 3/4 inch strips of pine or spruce on top of this strip right down the centerline. You could use several layers of the 1 inch cloth laminated in place of the wood strips but they will weigh more. This keelson will give the hull thickness to hang the keel on and support fore and aft. Load spreaders will still be required on each side of the keel bolts. The "Sirius 45" calls for the keel fin to pass through the bottom of the hull and be glassed permanently in place. The keelson wood is needed only under the area below the mast step.
Check the beam measurements of your particular model; it may be necessary to spread the hull slightly or even to push it together to get the beam at the desired measurement.
This article Fiberglass Model Yacht Builders Guide is Extracted from a draft copy Book on Model Yacht Building by Dave Mainwaring, Framingham, MA
Copyright 1979
6/28/2006
Star 45 R/C model sail boat | making your own keel bulb
From: "Adams, Jim" Don,I made a plug from balsa and finished it to a smooth finish, second I used two aluminum pans (the kind that you throw away) I filled the first one with plaster took the bulb (well waxed) and placed it in the plaster half way in I used two pins through the center to hold it down. let that dry then pull out the plug, next put thin saran wrap over the mold and place the plug back in the hole. Now comes the fun part I used rubber bands to hold the plug in place (remember I had two pins that extend past the mold walls) next fill the second pan with plaster and lay the first on top, it is kind of messy but it works. When the second half dries (about two hours) pull them apart. You will need to plug the holes at the ends on the sides and create small air path upward in the and a spur (looks like a funnel when you are done this needs to be big enough to pour in the lead) at the end. Any questions?
Star 45 R/C model sail boat | Terry's progress
Hi Don: Terry here in stormy south Florida.. I have been following all the chatter on wood vers. fiberglass hulls. Weight and so on. One of my new hulls is just completed. It is out of wood and has a bass wood planked deck and all formers are used. I don't use the 2 layer bottom.. I use 1/16 3 ply plywood cut into strips for the bottom planking. This allows me to follow the nice curves that the star 45 is noted for. I then use "wood flower" fine saw dust and epoxy and one of those many credit cards that you get in the mail to fill in the gaps. I use this peanut butter mixture to fill the gaps and prior to setting up use my gloved fingers to smooth out the epoxy mixture that has come through the inside. I then sand the bottom of the hull and use packing tape to seal the bottom of the hull from the outside surface. I then use epoxy and brush a good coat to cover and penetrate the wood. I have built 4 hulls like this and they all are sailing fine.
I have a finished hull with all the servo-mounts and deck. The hull has been coated with epoxy and sanded. Hull sides and bottom primed and painted. The strip deck has been spar-varnished. The weight of the hull with out anything else is now at 21.23oz. this is without the light plexy radio cover.
I dint know if I would want a hull any lighter but to each his own. It is more about twiggling the sticks and sail tuning and BASIC sailing know how that wins races.
I want to post some photos as I am now building the rigging and fitting out the hull.
I would like to see how others have rigged the sheets and lines. I have used a combination of ideas that I got from other boats while at several of the Ft. Pierce races.
I am using a grovey mast with a spreader. I use one set of standing lines and one set of running lines. I use the coated stainless leader wire from bass pro shops. I use home made mast crane and mast block. I use arrow shafts for booms. I have windjammer sails and the boats run great. I have a plaster mold for the keel bulb. I make a plug out of balsa and then molded it with a 1 x 1/2" wood frame. the only pointer you might consider other than the harmful fumes is to place your mold in a warm oven for 1hr. or more as to get the moisture out of the mold. Otherwise the first few castings will have steam tracks or pockets. I have only used the wooden keels made form the layers of ply. I like the look and the boats don't try hooking as much. The flat metal keels have a very sharp angle of attack. When the shaped keel is heeled over it has a more forgiving angle of attack. I tryed both keels in my pool. The metal sheet planes at a very shape angel and the shaped one is more forgiving.
I will get some photos up shortly. Terry
Star 45 R/C model sail boat | sample Rigging list
A typical list of fittings:
Sources:
http://gbmy.com/
http://www.worthmarine.com/
Main Boom kit #100L
Jib boom kit #102
Gooseneck/kicking strap #112
Head fitting #120
Turnbuckle (2 pk) #260 Need 4 total
Tangs (4 pk) #282 4 is all you need
Bowsies(10 pk) #199
KDH single block #250 Two each
Sheet Hooks (20 pk) #280
Of course there’s many things that can be substituted.
Instead of wooden or arrow shaft booms, airplane clips instead of the turnbuckles and so on.
The servo of choice is the RMG 280, or 380.
From: "Robert Gonzalez"
I ordered both size head cranes - I think the smaller one is ok, but I'm not
sure. Woody has one and is bent more at 90 degrees since according to the rules
the crane is included in the 70" mast height.
I also ordered the 1/2" mast head and foot inserts. They don't fit the new masts without being sanded down some.
I wasn't sure what I wanted to do for an adjustable foot. I ordered the Sail Etc
deck track and adjustable mount. Mine has popped out on Woody more than once.
Don (at Great Basin) doesn't offer many choices for these parts.
I need some more Pekabe fairleads if I run the rigging under the deck and if not
then Woody has three blocks on deck - using the bungee method.
I got the side stay racks this time and the jib rack - not sure I'll use them or not.
Quick release turnbuckles are nice. At $10 ea - they're kind of high dollar
but easy to use.
Don>>the KDH quick release turnbuckles are 2 to a package for 10.90.
6/23/2006
The AMYA Star 45 R/C model sail boat


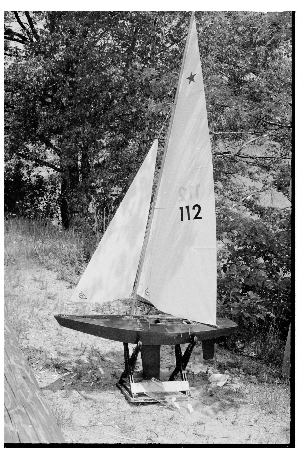
"The Star 45 is a 45" long hard chine hull; semi-scale model of the full-size Olympic Star. Some of these models are scratch built using plans available from the AMYA. Others are partially fabricated with major components available from suppliers. A typical prefabricated approach for a Star 45 with all radio electronics could cost $500-$600. This one design class allows few variations."
From Star 45 Group June 2006Join the Star45 yahoo group {no space bewteen Star and 45}
www.yahoo.com
The AMAY http://www.amya.org
Subscribe to:
Posts (Atom)